


Carthage Blog 13 - The Gear and the Process
- Jul 31, 2025
- 20 min read

Introduction
There's been a blog post for each song on the album, which you can read on the blog page here at Scot Stoddard Music. The album has been released on June 25, 2025 and is on all major platforms, plus Bandcamp and even my page on VK.com, which is like a Russian version of Facebook! The entire album is also here on Scot Stoddard Music, and you can get a free download on the Carthage page of this site. Each blog post contains historical background on each individual track, a breakdown of the music of the track and an analysis of how it all fits together. Now that that's all been accomplished, in this blog I'd like to talk about the gear that made all this Carthage music come to life, as well as my recording process, itself.
So we'll start from the beginning of the process.
The Software
I don't go to a studio to record; I do all my recording at home, and generally, this entire album was recorded in my living room. All recording is done direct; that is, guitar or bass, into a pedalboard, into an amp, into my USB interface, into my computer. There's nothing really fancy here. The software I use is PreSonus Studio One. I have an older version, Studio One 4.5, Studio Version. They're up to a new Version 7 now. Everything other than bass and guitars is done via programming MIDI instruments.
At the beginning of any track, I usually have no idea where the track is going to start of end, but because of the research I do ahead of time on the topic being covered, I have a general idea of the mood or genre of the track. Whatever it's going to be, the first step is opening the software and setting up some tracks. Let's start at the first song, Dido. So I open the software and I start loading the drum kit first. I have a drum kit built already that I used on my last three albums, The Olympians, Valley of the Kings and Kengir. It gets modified a little bit for each album. I do NOT play the drums live, as I do not have the proper gear and space needed to do that, and trying to play the drums and record them yourself is just ... I don't know, it's too much. So I do ...
Drum Programming
So I do have a drum set, and before recording the Olympians album, I set about the task of sampling the entire drum set. I have a handheld or mountable Zoom hi-def digital recorder that works great as a sampler, and I took other samples with a set of drum kit microphones. So I took various samples of each drum and cymbal in my drum set at different velocities. When we talk about velocities in terms of samples, it's basically how hard you hit the drum. So a soft hit, a medium hit, a hard hit. Then a hit in the middle of the drum head, a hit off to the side of the drum head, a rim shot on the snare, the edge of they cymbal, a hit in the middle of a cymbal, a hit on the bell of the cymbal. All these samples get processed in what used to be Cool Edit Pro, now called Adobe Audition, labeled appropriately and placed into a sample library. There's free trial version of Cool Edit Pro at that link; try it, you'll love it. I use Cool Edit Pro for this purpose, but also for file cleanup. It gives you the ability to visualize each waveform, zoom in and clear out any unwanted noise. See example below!


This was from a bass track, and there was some unwanted noise there. I got rid of it. Could be a string scrape, a hiss, buzz, my finger hit a different string on releasing the note; whatever. Clean it up. This makes for really clean-sounding tracks. I do this procedure on every track I record a live instrument on for every song. It's tedious, but very worth it.
Back to the drums. Without going into too much detail, I'll say that for each drum I then can build a set of samples for this album. Let's take the snare drum, to start. I will open the Studio One Impact instrument for drums, which will get me a set of "pads" I can load samples onto. Each pad has a corresponding key on the virtual keyboard that pops up in the software. So for example, I can drop a sample "snare center" on the C key, "snare rim shot" on C#, "snare soft" onto D, and so on. I usually use 8 snare drums samples. I will load up my set of 8, then save it as a preset labeled "Carthage Snare". Then when I move to the next song, I just open the snare track and load that preset, and I have the exact same samples ready to go. And if there's something needed that I don't have on my kit, say, Latin percussion, congas or timbales, I have additional sample libraries that came with the software or that I've acquired along the way. So I have a LOT of samples available.
So now our snare drum is set up for the entire album, and I'll use that same set of snare drums samples on all the tracks, just load the preset and go.
Same thing for the kick drum; load the pads with samples, including two electronic kick drums from my libraries, and save it as a preset. You can also alter the pitch, add a filter, change velocity and other aspects of the sample via this MIDI instrument, see example below!

The photo below here is how you write out the actual kick drums part. Simply drop the sample on the grid in the right place. You have the ability to zoom in to the 64th note here, so you can dig right in and program away. You can see all the different kick drum samples available. This section is using two kick drums, both variations of the same sample, Mic L; meaning for the D#2 and B1 samples, the kicks are tuned slightly different. That "Mic" means they were recorded by a microphone, not the digital recorder (I used and mixed and matched both methods). Zoom means the Zoom recorder and mix is both combined.

Same thing with toms; load the samples, save it as a preset. I like BIG tom sounds, so I always do two tracks with the same samples, but they get different effects on them; the compression, EQ and reverbs are different. For this album I used the 10, 12 and 14-inch drums from my kit, plus three additional tom samples from my library and two electronic toms. In the photo below you see a short 16th note tom fill, which would get copied to the second tom track. Note in the middle of the screen "Quantize". This pull down menu allows you to change the values on the grid to display different note lengths or patterns such as triplets; in this case, 1/16 T means it's zoomed in to 16th note triplets, and the grid is adjusted accordingly. As you can see here, every note of every drum part for every drum and cymbal is programmed individually, one at a time; however, for repetitious parts, such as a kick drum pattern that's ongoing, you always have a copy/paste function available.

Same thing with hi-hats, same thing with ride cymbals, same thing with crash cymbals; load the pads with samples from my kit and additional samples from the libraries.
So now we have our pads set up and labeled Carthage Snare, Carthage Kick, Carthage Toms 1 and 2, Carthage Hats, Carthage Rides and Carthage Crashes. Seven tracks ready to go; the drum set is complete.
Now I go to insert effects. On each channel on the mixer of these seven tracks you can insert effects. I put compression, EQ and reverb where needed on the various drums. The cymbals get nothing.
Now is the cool part. My software allows me to save all of this as a template, which I will name Carthage Drums. Hit "Save as Template". So when I open the next song, I don't have to go through all of this again, I just load the template and BOOM! There's my drum kit ready to go. Cool, huh?
If needed, you can always add or replace a sample on any of those "pad" as you go, so no worries if I want a special sound on some song down the road.
Keyboards

Keyboards are written out in MIDI notation, also; it's just a different MIDI instrument. By the way, MIDI is an acronym for Musical Instrument Digital Interface. So again, I have a digital software piano loaded up here, and I use the virtual keyboard on the left side to assign notes to the proper value. Length of each note is determined by how far you place it on the grid, and the notation at the bottom is the velocity, or how loud each note or chord will be played on playback. So here you see a big chord sequence written out for Dido somewhere near the end of the track starting at measure 142. There's a window available in the software instrument where you can edit the sound of the instrument to whatever you desire, as well. You can add effects like reverb, delay, chorus, EQ and such right inside the MIDI instrument.
Other Instruments
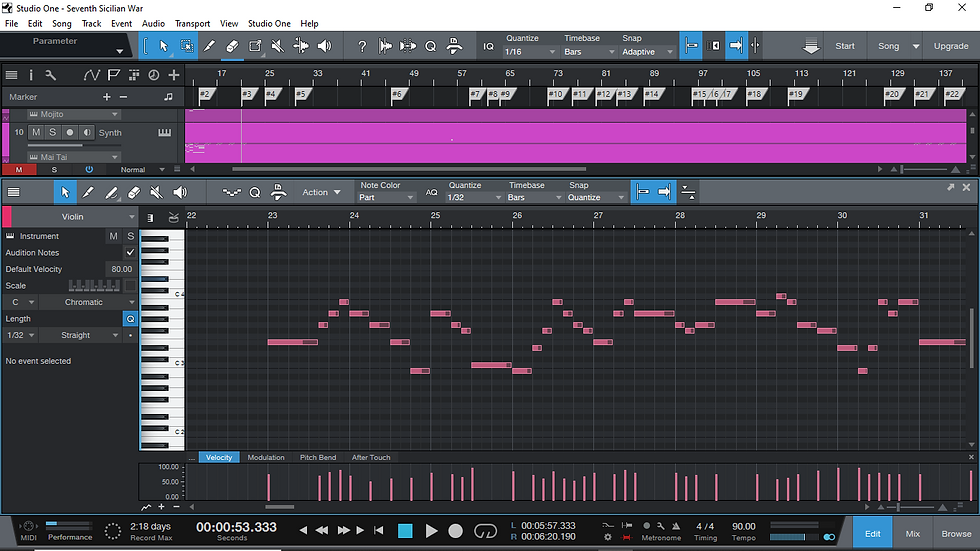
So what if you need, say, a violin track? Same thing as the piano, but this time I'll load into that same MIDI instrument a solo violin, and the same process. Same virtual keyboard, grid, velocities, and so on. The shot below is the main violin melody from "Seventh Sicilian War".
So there we have it! This covers our MIDI instruments. I usually start with a programmed bass part or a keyboard part for any song. Sometimes I'll start out with a piano part, write that out, then put the bass in, then program the drums. Sometimes I'll write out, say, eight measures of the bass part in MIDI for the opening section. Then I'll go back and program the drums for those same eight measures, and our rhythm section is in place for the start of our song, then I just add to it one section at a time. Then I'll add pad synths or piano or whatever else. Later on, when the whole song is written out in MIDI, I just look at and listen to that MIDI bass track, learn the part on the real live bass, practice it until I can play it, then record the live bass. When all the live bass is recorded, that MIDI bass track gets muted, never to be heard again!
But what about guitars?
Yes, we're going to need them, too. And sometimes, but rarely, I'll start a song or a section of a song using a scratch guitar track to be replaced later when we get to guitars. Sometimes you just have to write a guitar part, especially a heavy riff, on a guitar, then write the drums, bass and keyboards around that. But usually, guitars come last. Especially for unison heavy riffs, I will usually figure the part out on the 7-string guitar, then write it into the bass MIDI track without actually recording any guitar.
So all our midi instruments are in place: Drums, keyboards, additional instruments. The bass has been recorded from the MIDI track, and we now have live bass. It's now time for guitars. Let's round up the usual suspects.
For the real heavy stuff, nothing beats a good 7-string! This thing is a beast, the Jackson JS22-7
7-string guitar. This guy played all the heaviest riffs in all the songs tuned lower than D. Standard tuning here is a modified Drop A, low to high, A-E-A-D-F#-B-E. This Jackson has some serious low end and, depending on the passage, I'm usually on the bridge pickup for some extra bite.

For the intricate chord progressions of non-heavy riffs, and also Drop D usage, maybe a song in the key of E, my main guitar on this album was the Schecter C-1 Elite. This guy stays in standard tuning unless it's in Drop D. I found this on the used rack at Guitar Center in Syracuse, NY and got it (kind of stole it) for a mere $350. It's an incredibly comfortable guitar for chording and also shines for leads where a tremolo is not require, as it's a fixed bridge. It has two Seymour Duncan dual-coil humbuckers, a volume knob and a push-pull tone knob for coil-splitting. Very versatile guitar, and it sounds sweet and rich.

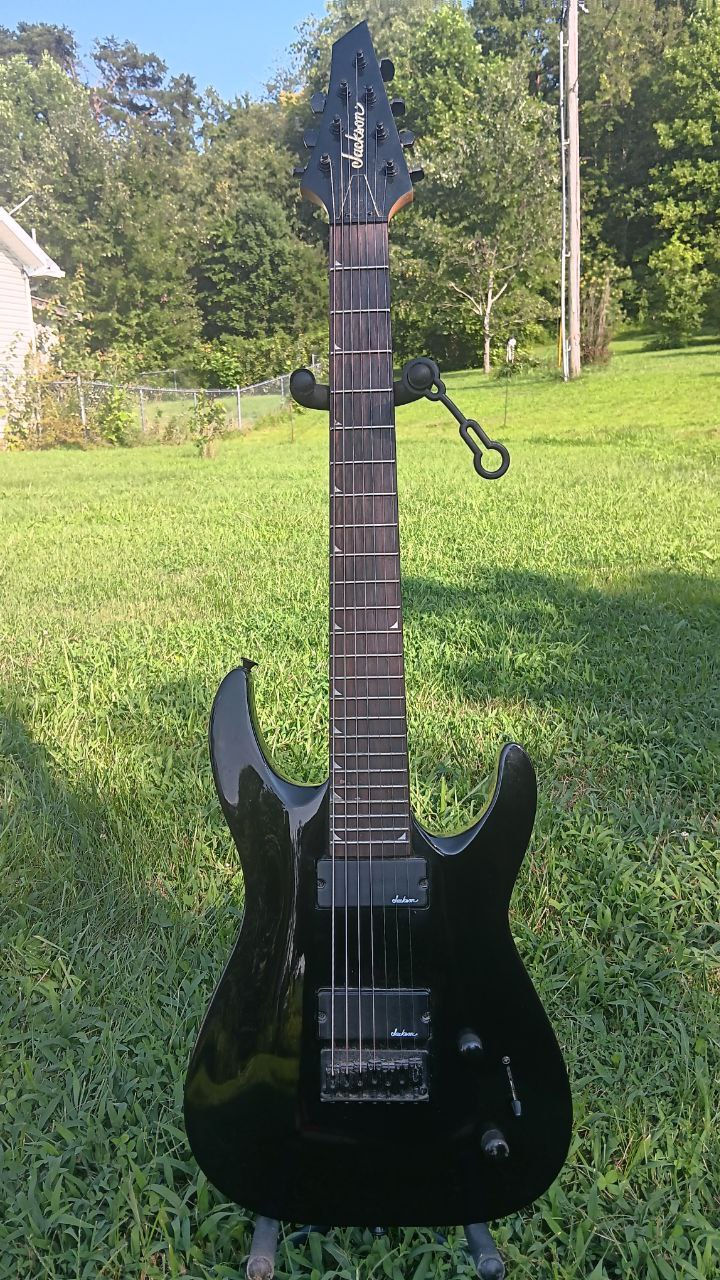
For all the histrionics and the craziest leads, we bring in the 2006 Jackson JS30 DKT Dinky with a Floyd Rose tremolo and reverse headstock. This guitar is responsible for probably 75 percent of the leads on the album, and all the divebombs, tremolo bends, European ambulance sounds and elephant imitations, as well as many of the most beautiful melodies. It's just a joy to play, with a very comfortable neck that you can just shred on, and the reverse headstock adds sustain. The licensed Floyd Rose can be pushed to the wood for the deepest of divebombs and come up perfectly in tune thanks to the double-locking tremolo system. I picked this up at House of Guitars in Rochester, NY on a trip home from Niagara Falls sometime around 2012. and it's probably my favorite guitar to play.
These were the main guitars, although there were others on occasion, but let's move on to the bass.
The Bass!

My bass for this album was a little something I had wanted to try for a long time: A 6-string bass. This is from Glarry Musical Instruments, a rather new company that got started around 2014 in the Eastern US. They make some really quality instruments for affordable prices. So I didn't want to make a big purchase on an instrument I wasn't familiar with, I found this guy on Temu and thought I'd give it a try. With a purchase price of $135, I figured it would be an okay starter 6-string. Why not go for it? Honestly, for that price, I wasn't expecting much. But what I got blew me away. This thing is incredible. Controls include a master volume, bass knob, mid knob, treble knob, bass boost knob and a pickup blend knob, allowing you to blend the two pickups in whatever way you'd like. The tone is amazing and the tonal possibilities are endless. There's a LOT of real estate to cover here, with 24 frets, and the range is unbelievable. Tuning is, low to high, A-D-A-D-G-C. I love this bass! I really wanted to step up my bass game on this album and spent tons of time writing and playing the bass parts, probably more time than I spent on guitars. And with the pedalboard below, my tone improved greatly, as well.
Bass pedalboard

So I decided, since I had a new bass, I need to make it sound as good as I possibly could for this huge upcoming Carthage project, so I put together this small pedalboard with the essentials of bass tone. I will walk you through these pedals.
Rowin LT-901 tuner: A basic tuner from Rowin, another Temu purchase for around $17. You gotta have a tuner, and this has a bright display and it's very simple to operate.
Behringer BEQ700 Bass Graphic Equalizer: This is a nice 7-band EQ tuned specifically for bass frequencies. Lots of people gripe about these Behringer pedals and their plastic cases, but I've had no problems at all with it, and it really helps the bass tone. I'm not going to jump up and down on the thing, it's durable enough for studio purposes. And I got it from Sweetwater for $30. Can't beat it.
Behringer CS400 Compressor Sustainer: Another must have pedal for any bass application is compression, and this one does the job very well. Pretty easy to use, nothing fancy, just compression, and pretty transparent; it doesn't suck your tone. In fact, one of the better features of this pedal is the tone knob! Again, from Sweetwater, about $30.
TC Electronic Vortex Flanger: Flanger, for bass? Hell, yes. I'm a big fan of TC Electronic pedals, as you'll see when we get to the guitar pedalboard. This is from the TonePrint series, so you can download toneprints from various artists. I have John Petrucci's Toneprint, and I use it on the bass. Because why not? You can hear this in action on tracks like Melqart and Battle Elephants, and many others. This pedal was originally on my guitar board, but when I got a new chorus pedal, I decided to put this over on the bass board for a bass modulation pedal. I find it works well in this application.
Boss BCB 30x Board: A small boss pedalboard with a very solid, rugged, closable shell, designed for three pedals, but I was able to squeeze my tiny tuner in there, also. That's another attractive feature of the Rowin LT-901; it takes up very little space, and I got it just for this fact. The board came with the One Spot daisy-chain type power supply included with four power taps, so I was good to go with adding the tuner. And I love this setup. I really get some great bass tones now and upped my bass game.
So that rounds out the bass gear, let's move on to the guitar pedals.
Guitar Pedalboard
I used a pedalboard design app for this purpose, to show just the pedals without all the power taps and chords all over the place. But this is the exact layout of my board and pedals. There's two rows here, so the signal chain goes right to left, lower row to upper row, with the route starting at the drive section on the bottom row, then to the noise gate in the top right corner, and all the other goodies on the top row, again, right to left. This is the main photo for the blog post, but I wanted to put it here again and walk y'all through what these pedals are and what they do. Start bottom row, right to left, the drive section.
Mosky Golden Horse Overdrive: The Klon is a very famous guitar pedal, rare, highly sought-after and expensive as hell these days. They're going for crazy prices in the used market, as they're no longer made. I'm talking like thousands of dollars. The Mosky Golden Horse is a Klon klone, and I got this for $17, again, from Temu. It's a highly transparent overdrive pedal, meaning it doesn't color your tone (like the SD-1). It can go down to a really low gain level, up to a moderate growl or low distortion sound. I didn't start out the album with this pedal on the board, but picked it up somewhere around Track 8, Battle Elephants, and it changed my whole approach to the rest of the album. This was the overdrive tone I was always after, but didn't know it. Even I finally learned and got a Klon-type pedal. It's great as a stand-alone low-gain overdrive, it stacks well with other pedals, and it can be used also as just a clean boost. Great pedal.
Boss SD-1 Overdrive: If you play guitar, you probably own this pedal. This and the DS-1 are a couple of the most popular Boss pedals ever. It's a good overdrive, producing a warm, smooth sound of an overdriven tube amp. To me, however, it's a little dark sounding, and that's where there's a big difference between the Golden Horse and the SD-1. They both have their purposes, and they stack very well together.
Boss DS-1 Distortion: Another very popular and widely-used Boss pedal. I've had the SD-1 and the DS-1 for years, and they've been the staples on all my boards of the past. So they had to be on this board, too! It's required! The DS-1 has been on hundreds of recordings and has been used by famous artists from Curt Cobain to Steve Vai and many, many others. It's a staple on any rock player's board. But it's not a high-gain distortion; it's kind of a moderate, classic rock type of distortion.
Boss MT-2 Metal Zone: THIS is the high-gain distortion pedal to die for if you're after modern high-gain tones. It's has copious amounts of gain and a diverse EQ section that really lets you dial in your tone for all the high-gain hijinks. It's kind of tough to dial in, but once you get it, you'll love it. This pedal has a story behind it on my board. I had bought the MT-2 for my wife Cat and sent to her, while she was still living in Moscow, as a Christmas present. What do you get as a Christmas present for your wife that loves metal? Well, a Boss MT-2. It was very romantic, lol. So when Cat moved here, she put it in a drawer in her office, and we kind of forgot about it, because on previous albums were were mainly using a Line 6 Spider V 60 amp that had all the effects built in and we didn't rely much on pedals. So when I was building this pedalboard, I thought about it and asked Cat: Hey, do you still have that MT-2 I sent to you in Moscow? She dug it out of the desk drawer, and it went on the board. Our MT-2 has over 10,000 miles on it. Great high-gain (and high flying, in this case) distortion pedal.
So that completes the drive section, but before we move on, I want to briefly discuss gain stacking, for those unfamiliar with the concept. So all gain stacking is is employing two drive pedals (or more) at the same time to get different tones. You'll notice in my setup here, from right to left, the pedals are arranged from the lowest gain to highest gain. When you're doing gain stacking, keep in mind that the tone or flavor of the last pedal in the chain is where your color of the tone comes from. So if I engage the Golden Horse and the SD-1 at the same time, the idea is to give the Golden Horse low gain and keep the tone moderate to boost the SD-1, and it really adds a lot more sustain and gives you a fatter tone. Then you can shape the tone further with the tone knob on the SD-1. So there's a lot of possible combinations here to shape tone: Golden Horse with SD-1, Golden Horse with DS-1, Golden Horse with MT-2 (which is amazing). Then you can go SD-1 into the DS-1 or MT-2, and ,,, you get it. You just have to watch your gain settings on the first pedal in the chain and the tone settings on the last one, and have fun. It's a different way to get great tone combinations.
So now let's examine the top row, and these are all from the same series of TC Electronic pedals, very affordable, under $50 each, but sound amazing. I'm not into high-end boutique pedals. I want basic pedals that do the job, sound great, are easy to operate and are reliable. I want to spend more time playing and less time turning knobs. These fit the criteria. Again, we will go right to left and follow the signal path across the top row.
TCE Iron Curtain Noise Gate: If you have any type of gain pedals, and especially if you're going to delve into gain stacking, you're going to want a noise gate or noise reduction pedal to get rid of any hissing or extraneous noises inherent to gain pedals. The Iron Curtain does the job very well. It's not a glamorous pedal, but it cleans up your sound very well, and is really essential, especially if you use guitars with single-coil pickups, like a Stratocaster, or my Ibanez RG 270 DX.
TCE Afterglow Chorus: A solid chorus pedal. Every board and every guitarist almost always needs some kind of modulation pedal, and this one is really nice. It can get you anywhere from a nice, light, shimmery chorus to the deep wobbly special effect sounds similar to Korn guitarist Brian "Head" Welch. I use this pedal to fatten up high-gain leads, as well as on quiet, melodic clean-tone passages. It's that good.
TCE Prophet Digital Delay: Delay is one of my favorite guitar effects. I use delay on a lot of leads, except for things that are really fast; it really adds an extra dimension. This is a classic bucket-brigade style digital delay, meaning the repeats decay like an old style analog delay. This pedal can give you anything from a slapback delay like surf rock up to 1,300 ms of all-out space effects. It has a slider switch for different modes as a starting point, then a pretty standard setup of time, mix and repeat controls. It's very transparent and doesn't color your tone. Just a damn good delay pedal. As Sweetwater says in their write-up for this pedal "Around here, delay is a food group". And this pedal is delicious.
TCE Skysurfer Reverb: Again, another nice pedal from TCE. It's very versatile, with a slider for three different types of reverb: Plate, Hall and Spring. I don't use the spring setting much, but plate and hall are really nice. That's just the flavor I like. And again, anywhere from a hint of reverb to space effects are available with this pedal. There's again a simple setup for controls: Reverb (amount), mix and tone. Easy to use.
So that's the pedalboard. I really enjoy all the tonal possibilities of this board and had a blast using it in recording Carthage. You can hear it all in the results.
Fret Wraps!
In relation to guitars, there's one other little thing I want to mention. Fret wraps!
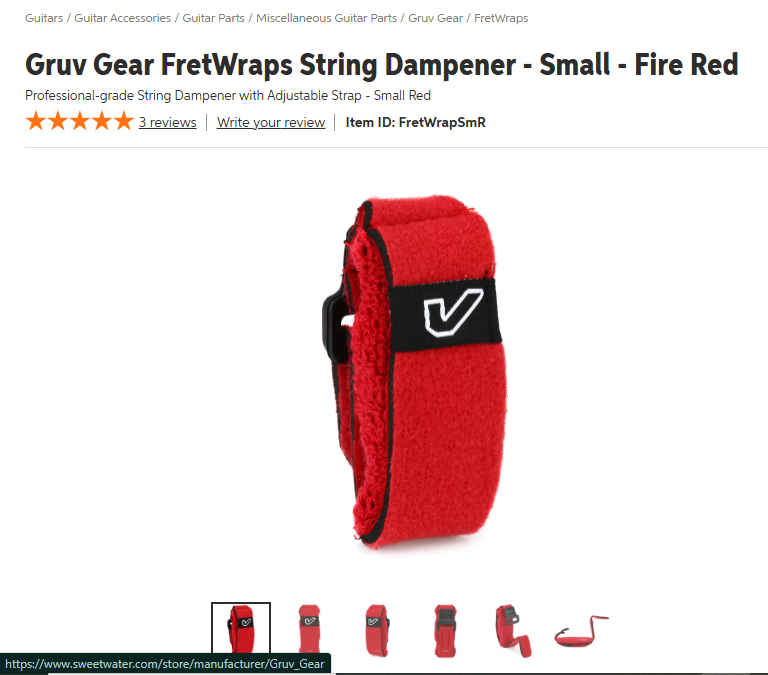
So what the heck is a fret wrap and what does it do? Well, you can see one on the photo of my Schecter C-1 Elite above. You wrap it across the strings down by the nut, generally, or perhaps further up for a higher tapping section, and it's keeps the strings slightly muted, prevents unwanted overtones or strings ringing out. You can adjust the tightness of the wrap via a velcro-type setup so it's loose or tighter, depending on what you're after. I use these on all my guitars and my bass to help get a cleaner sound and cut out unwanted noise and ringing. They're really great for when you're playing leads up the neck and you don't want extra overtones from open strings, and really cool for tapping sections to keep un-needed strings from ringing and junking up your tapping. Get one and try it out, they're about 15 bucks and really cool!
Now there's only one more critical piece of this monstrous puzzle: The Amp.
The Amp!

For this Carthage album, I went exclusively with my Blackstar HT-1RH tube amp head. Cat was recording guitars for her album at the same time as I was recording Carthage, and she was using our Line 6 amp, so instead of shuffling the Line 6 back and forth and wasting recording time and scheduling who gets the amp tonight, I went with my Blackstar for the entire project, and it sounds great with the pedalboard, or without! I've used this amp on prior albums, but not as my main amp. I didn't have the extensive pedalboard I have now. I really liked the Line 6 and all the built-in effects it has, but I wanted this album to be different. So a tube amp with a distinct warmth that only a tube amp can give and pedals was the route I took. I'm glad I did.
This amp has a wide array of sounds to it. It's a two-channel amp with a gain channel and a clean channel. It's tiny, it fits anywhere, and for this project, it just sat it on top of my bass amp right next to my computer desk in a nice little amp stack. I don't know what Blackstar puts into these amps for tubes, but this thing sounds great by itself on that dirt channel, and with the gain cranked up, it can roar. You might chuckle at the one-watt rating, but I'm not playing Madison Square Garden or the Syracuse Carrier Dome, so this is perfect for recording. While I did use the dirt channel on occasion with no drive pedals, to get that strictly tube amp sound, I mostly stayed on the clean channel with the gain about halfway up, just at the edge of the breakup zone, then added my drive pedals on top of that for delightful drive tones. For cleaner sections, I back the gain off to a quarter or less, but still left a tiny bit of gain there for character. This amp is different from most in that there's no real standard bass/mid/treble knob section, but in place of that is the EQ knob which is pretty cool. With the knob all the way to the right, you get a classic American tube amp sound with lots of grit and more bite. All the way to the left, you get a classic darker British rock sound. So you can mix and match those sounds by dialing that EQ knob in anywhere in between. I like of like it just to the right of middle, about 1 o'clock. Dark with a little bite.
Conclusion
So we built the song from the bottom up; the only way to go. All the MIDI instruments, then bass, and rhythm guitars, then the leads come last. One other thing to discuss quickly is my use of MIDI tracks to write melodies. I often write out guitar melodies on a keyboard or synth track before I record them on guitar, so I know ahead of time exactly what I'm going to play. Then it's the same as how I do the bass track, I can read the MIDI notation and play the melody as it's written. Also, quite often on this album, I've left the MIDI track playing along with the lead guitar for a layered effect, panning the MIDI instrument to one side for depth. It worked out very well. Could be a piano, a synth or a violin, depending on the situation. I like this technique. It's a long and involved process that probably a lot of guys don't go through. It's taken years to refine this process so it works the best for me, and maybe you've picked up some pointers here along the way. If so, fantastic; glad to be of help. I just wanted to take this opportunity to show what went into the recording of Carthage, as well as the gear I used.
I hope you've enjoyed this look into my process of recording this album and a look at the gear used to do it all! Thanks for being here with me, and I hope you'll listen to the album again and again. Enjoy!
Comments